
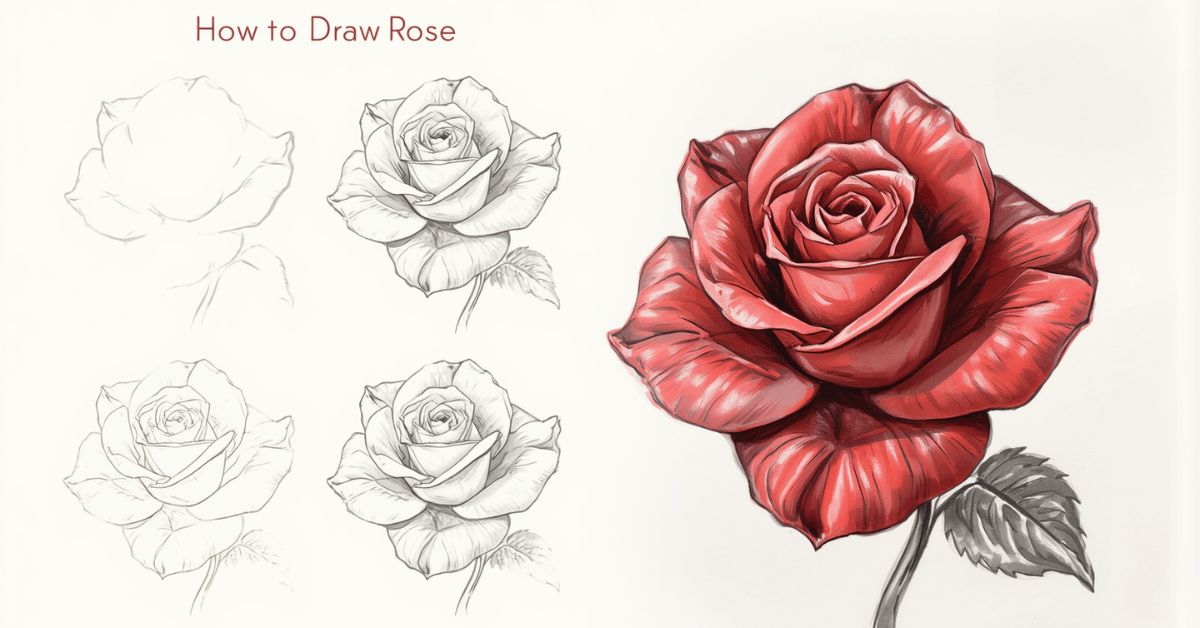
The rose is one of the most beloved subjects in art, appearing everywhere from greeting cards to tattoos to botanical illustrations. Despite its delicate, layered appearance, drawing a rose is far more approachable than it looks, especially once you understand the simple spiral-and-petal structure that forms its foundation. Many beginners avoid flowers altogether, assuming they require advanced shading or precise botanical knowledge, but a rose is actually one of the most forgiving subjects to practice.
Because real roses grow with natural asymmetry, small imperfections in your linework won’t stand out the way they might in a more geometric drawing. This makes the rose an ideal subject for building confidence with curves, layering, and basic shading.
This guide breaks the process down into an easy, repeatable method, along with variations, shading tips, and common mistakes to avoid, so you can create a rose you’re proud of, even on your very first attempt.
Understanding the Structure of a Rose

Before sketching, it helps to understand the basic anatomy of a rose, since recognizing these individual parts makes the entire drawing process feel far less intimidating. A rose isn’t one complicated shape, it’s really just a handful of simple elements repeated and layered together.
At the very center sits the spiral core, the tightly curled point where the petals originate. This is often the smallest and most compact part of the flower, and it sets the starting point for every layer that follows.
Surrounding the core are the inner petals, small and closely wrapped around the center, still holding much of their curled, protective shape. As you move outward, the outer petals become progressively larger and looser, opening up and curving outward as they catch more light and space.
Beneath the petals sits the calyx, the small green, leaf-like base that holds the flower together where it meets the stem. From there, the stem extends downward, often with a gentle curve rather than a perfectly straight line, giving the rose a more natural, organic feel. Finally, leaves branch off the stem, typically pointed with slightly jagged edges, adding balance to the overall composition.
Understanding how petals unfold in layers, tightly curled near the center and progressively looser toward the outside, is the key insight that makes roses so approachable to draw. Once you see the flower as a series of simple, repeated shapes rather than one complex form, the entire process becomes far more manageable.
Essential Tools & Materials
Drawing an easy rose doesn’t require a large art supply collection. A few basic tools, used thoughtfully, are enough to create a clean, satisfying result, whether you’re sketching quickly or working toward a more finished piece.
Pencils are the starting point for any rose drawing. An HB pencil is ideal for your initial construction lines, since it’s light enough to erase cleanly if you need to adjust petal placement. Once you move into shading, a softer pencil like a 2B allows for richer, darker tones in the areas where petals overlap and create shadow.
Erasers matter more than beginners often expect. A standard eraser works well for cleaning up stray construction lines, while a kneaded eraser is especially useful for softly lifting graphite to create subtle highlights on petal edges without leaving harsh white patches.
Paper choice can shape the final look of your rose. A slightly textured sketch paper holds graphite nicely and is forgiving for shading, while smoother paper suits cleaner, more precise line work if you’re aiming for a more graphic or illustrative style.
If you’d like to finish your rose with a polished outline, a fine-liner pen or fine-tipped marker works well over your pencil sketch. For adding color, colored pencils allow for soft, controlled blending, while watercolors can create a more natural, flowing gradient across the petals.
For digital artists, tablets paired with apps like Procreate offer textured petal brushes and blending tools that can make shading and coloring even more intuitive.
The Easy Spiral Method (Step-by-Step)
This method breaks the rose down into simple, repeatable steps, making it one of the most beginner-friendly ways to draw a realistic-looking flower without needing precise botanical accuracy.
Step 1: Draw the center spiral. Lightly sketch a small, loose spiral in the middle of your page. It doesn’t need to be perfectly even, real rose centers are naturally a little irregular, so a slightly imperfect spiral actually helps the drawing feel more organic.
Step 2: Add the first inner petal layer. Around the spiral, draw a few small, curved C-shaped lines that wrap closely around the center. These represent the innermost petals, still tightly hugging the core.
Step 3: Build outward with overlapping petals. Continue adding petal shapes in layers, working outward from the center. Each new petal should overlap slightly with the ones before it, gradually increasing in size as you move further from the core.
Step 4: Draw the outer, looser petals. For the final layer, draw a few larger petals curving outward and slightly downward around the outside of the flower, giving the rose a fuller, more open appearance.
Step 5: Add the stem, calyx, and leaves. Extend a gently curved line downward from the base of the flower for the stem, add a small calyx where it meets the petals, and include a couple of jagged-edged leaves branching off to one side.
Step 6: Clean up final line work. Erase leftover construction lines and darken your preferred lines for a polished, finished sketch.
Alternative Easy Methods for Different Skill Levels
While the spiral method is a great starting point, there are a few other simplified approaches that work well depending on your comfort level or the style you’re going for. Trying different methods can also help you discover which technique feels most natural to your own hand.
The loop method is ideal for absolute beginners or anyone drawing a rose very quickly. Instead of building distinct petal layers, you draw one continuous, looping line that curves back and forth on itself, gradually spiraling outward. This creates the impression of overlapping petals with a single unbroken stroke, making it fast and forgiving, though it offers less control over individual petal shapes.
The heart-petal method builds the rose from a series of simple heart or teardrop shapes instead of curved C-lines. Starting with a small heart shape at the center and layering progressively larger hearts around it creates distinct, well-defined petals that are easy to control, especially for those who find freeform curves tricky to manage.
The simplified cartoon or doodle style strips the rose down even further, using minimal petal layers and bold, clean outlines rather than detailed shading or realistic proportions. This approach works well for journaling, stickers, or quick decorative sketches where charm matters more than realism.
Choosing between these methods comes down to your goals. The spiral method offers the most balanced, realistic result, the loop method prioritizes speed, the heart-petal method offers more structure and control, and the doodle style favors simplicity and stylization.
Drawing Roses from Different Angles
Once you’re comfortable with the basic spiral method, practicing different angles adds variety to your drawings and helps you understand the rose as a true three-dimensional form rather than a single fixed image.
Front-facing (fully bloomed) rose: This is the most common and recognizable angle, showing the flower looking directly at the viewer with petals radiating evenly outward from the center. It’s the easiest starting point since it follows the spiral method most directly.
Side-profile rose: Viewed from the side, a rose shows much more of its stem and calyx, while the petals appear layered and stacked rather than radiating outward. This angle emphasizes the curved, cup-like shape of the flower and works well for botanical-style illustrations.
Rosebud (unopened) variation: A rosebud simplifies the process significantly, since it’s essentially just the tightly curled center spiral with a few small outer petal layers wrapping around it, without any fully open petals. This makes it one of the fastest rose variations to draw.
Top-down view of an open rose: Looking straight down into a fully bloomed rose reveals the spiral pattern of the petals most clearly, similar to looking into a maze-like center. This angle works well for decorative or pattern-based designs.
Adjusting the spiral-and-petal method for each angle mainly involves changing how much of the stem and calyx is visible, and how tightly or loosely the petals overlap, while the core layering principle stays consistent throughout.
Adding Shading and Depth
Shading is what transforms a simple line drawing of a rose into something that feels soft, dimensional, and lifelike. Since petals naturally curve and overlap, understanding how light interacts with these layers is key to creating convincing depth.
Identifying your light source is the first step. Decide whether light is coming from above, the side, or at an angle, and keep this consistent throughout the entire drawing. This decision determines which petal edges catch the light and which fall into shadow.
Shading between overlapping petals is where most of the depth comes from. Wherever one petal overlaps another, the petal underneath naturally receives less light, so these areas should be shaded slightly darker. This simple technique alone does most of the work in making the rose feel three-dimensional rather than flat.
Shading techniques vary depending on the look you’re going for. Hatching, using small parallel lines, creates a textured, sketch-like feel, while blending, using a blending stump, tissue, or even a fingertip, produces smoother, softer transitions that suit the delicate nature of petals particularly well.
Soft gradients work especially well for roses, since real petals rarely have harsh, defined shadow lines. Gradually darkening tone from the base of each petal toward its overlapping edge mimics this natural softness.
Adding highlights along the outer curves of a few petals, using a kneaded eraser to lift graphite gently, can suggest a soft sheen or dewy freshness, adding a final touch of realism to the finished piece.
Coloring Techniques
Adding color brings a rose drawing to life, transforming even a simple sketch into a vibrant, finished piece. The right technique largely depends on the tools you’re using and the level of realism you’re aiming for.
Choosing a color palette is the first step. Classic red remains the most iconic choice, evoking romance and boldness, while soft pinks lend a delicate, gentle quality. Yellow roses bring a cheerful, warm tone, and white roses, though trickier to color, rely almost entirely on subtle shading to define their form. Multicolor or gradient roses, blending two or more shades across the petals, can add a modern, artistic touch.
Colored pencil blending works well for controlled, gradual color buildup. Start with a light base layer across each petal, then gradually deepen the color near overlapping areas and petal bases where shadows naturally fall. Blending pencils or a light layer of white can help soften harsh transitions between shades.
Watercolor techniques suit roses particularly well, since the medium naturally creates soft, flowing gradients. Wetting the paper first and dropping in color allows pigment to spread organically, mimicking the delicate, translucent quality of real petals. Layering deeper tones once the first wash dries adds dimension without losing softness.
Digital coloring offers added flexibility through layering and blending modes. Working on separate layers for base color, shading, and highlights allows for easy adjustments, while soft brush blending tools can replicate the gentle gradients seen in traditional media without the risk of overworking the piece.
Common Mistakes and How to Fix Them
Even with a simple, forgiving subject like a rose, certain mistakes tend to show up repeatedly among beginners. Recognizing these early makes it much easier to adjust your approach and achieve a more natural-looking result.
Overly symmetrical or stiff-looking petals are one of the most common issues. Real roses grow with natural irregularity, so petals that are too uniform in size and shape can end up looking artificial or mechanical. Varying petal size, angle, and curve slightly as you draw helps the flower feel more organic and alive.
Overcrowding the center happens when petal layers are packed too tightly together without enough breathing room. This can make the spiral core feel cramped or confusing rather than clearly defined. Leaving small gaps between layers, especially near the center, helps maintain visual clarity.
Missing stem and leaves is an easy detail to forget, especially when focusing heavily on the petals themselves. Without them, the rose can feel like it’s floating disconnected on the page rather than grounded as a complete plant.
Harsh, uneven line work often results from rushing through the sketching phase. Taking a bit more time with smoother, more deliberate curves, rather than short, choppy strokes, creates a cleaner, more confident finished look.
Inconsistent shading direction can undo an otherwise well-drawn rose. If shadows fall randomly across different petals rather than following a single, consistent light source, the three-dimensional illusion breaks down. Always double-check that your shading logic stays uniform throughout the entire piece.
Practice Exercises
Like any drawing skill, consistent practice is what turns the rose-drawing process from a slow, deliberate exercise into something that feels natural and intuitive. These exercises help reinforce the techniques covered so far while building genuine muscle memory.
Practicing the spiral in isolation is a great place to start, especially if the center of the rose feels tricky. Spend a few minutes drawing nothing but loose, varied spirals across a page, focusing on smooth, confident curves rather than perfection. This builds comfort with the exact motion you’ll rely on for every rose you draw afterward.
Drawing 5–10 rapid roses in a single sitting helps build speed and fluency. Rather than focusing on making each one perfect, aim to complete the full spiral-to-petal process quickly and repeatedly, allowing your hand to develop a natural rhythm for the layering process.
Practicing different angles and bloom stages adds valuable variety to your skill set. Try alternating between a front-facing bloom, a side profile, and a tightly closed rosebud within the same practice session, reinforcing how the underlying structure shifts depending on the view.
Combining multiple roses into a small bouquet sketch is a natural next step once individual roses feel comfortable. Practicing how roses overlap, vary in size, and interact with stems and leaves as a group helps prepare you for more complex floral compositions down the line.
Regular, low-pressure practice like this, even just a few minutes a day, builds noticeable improvement far faster than occasional, more intensive sessions.
Turning a Simple Rose into a Full Illustration
Once you’re comfortable drawing individual roses, it’s a natural next step to incorporate them into larger, more complete pieces of art. A single rose can serve as the foundation for a wide range of finished illustrations, from decorative designs to personal keepsakes.
Adding a vase or bouquet setting is one of the simplest ways to expand a basic rose sketch into a fuller composition. Placing your rose, or a small cluster of roses, into a simple vase outline, along with a few extra stems and leaves, instantly creates a sense of scene and context rather than an isolated flower floating on the page.
Incorporating roses into greeting cards, journals, or tattoo designs opens up plenty of practical, creative applications. A single, well-drawn rose makes for a striking focal point on a handmade card, a decorative journal entry, or even as a reference sketch for a tattoo design, where clean linework and balanced shading matter most.
Using the rose as a design element allows you to explore more pattern-based or decorative work. Roses work beautifully as repeating elements in borders, framing text or images with alternating flowers and leaves. They’re equally effective arranged into circular wreath designs, or repeated in a seamless pattern suitable for fabric, wallpaper, or digital backgrounds.
Approaching the rose this way shifts it from a standalone practice subject into a versatile building block, one that can be adapted and reused across countless creative projects once the core technique feels comfortable.
Frequently Asked Questions
What’s the easiest way to draw a rose for beginners? The spiral method is the most beginner-friendly approach, since it breaks the rose down into a simple center spiral surrounded by layered, overlapping petals. Starting small and working outward keeps proportions manageable, and slight imperfections actually make the flower look more natural.
How do I make my rose look more realistic? Focus on shading, particularly in the areas where petals overlap, since these naturally fall into shadow. Varying petal size and angle slightly, rather than keeping them perfectly symmetrical, also adds to a more lifelike, organic appearance.
What’s the difference between a rosebud and a full bloom drawing? A rosebud is essentially just the tightly curled center spiral with a few small petal layers wrapping closely around it, without any fully open outer petals. A full bloom includes several layers of increasingly larger, looser petals that curve outward, giving the flower a fuller, more open appearance.
Can I draw a rose without a reference? Yes, especially using simplified methods like the spiral or loop technique, which rely more on repeatable shapes and layering logic than precise botanical accuracy. That said, occasionally studying a real rose or photo can help improve your understanding of natural petal variation.
What coloring method looks best for roses? It depends on your tools and desired style. Colored pencils allow for controlled, gradual shading, watercolor creates soft, natural gradients well-suited to delicate petals, and digital coloring offers the most flexibility through layering and easy adjustments.
Conclusion & Quick-Reference Checklist
Drawing a rose might seem like a delicate, complex task at first glance, but once broken down into its basic spiral-and-petal structure, it becomes one of the most approachable subjects for artists at any skill level. From the easy spiral method to alternative styles, different angles, and shading techniques, this guide has covered everything needed to draw a rose with confidence, whether you’re sketching quickly or working toward a more polished, finished piece.
Use this quick checklist to reinforce your practice:
The Easy Spiral Method
- Draw a loose center spiral
- Add small, curved inner petals
- Build outward with overlapping layers
- Finish with larger, looser outer petals
- Add stem, calyx, and leaves
- Clean up final line work
Shading & Depth
- Choose a consistent light source
- Darken areas where petals overlap
- Use hatching or blending for smooth transitions
- Add subtle highlights for realism
Coloring
- Pick a palette suited to your desired mood
- Blend gradually from base tone to shadow
- Use watercolor for soft, natural gradients
- Try digital layering for flexible adjustments
Practice
- Master the spiral in isolation first
- Draw multiple roses quickly to build fluency
- Explore different angles and bloom stages
- Combine roses into bouquets or larger illustrations
With regular practice, this simple method will become second nature, giving you a reliable, satisfying subject to draw anytime, and a strong foundation for tackling more advanced floral illustrations in the future.